
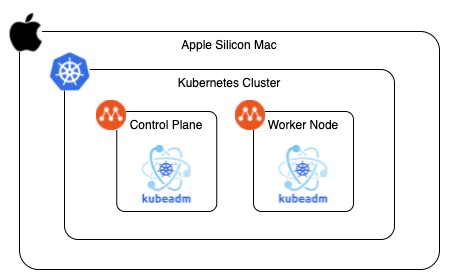
I will explain how to install Kubernetes on an Apple Silicon Mac using kubeadm and Multipass. In this blog, we will create a Kubernetes cluster with one master node and one worker node.
Note: For production environments, it is recommended to have three master nodes and multiple worker nodes for redundancy.
Why Multipass?
When I was studying how to manage Kubernetes cluster for CKA, I wanted to create my own environment where I could install and update a Kubernetes cluster with kubeadm. If we want to practice with kubeadm, we need to use a virtual machine tool. VirtualBox is one of the most popular tools, but unfortunately it doesn’t work well on Apple Silicon Mac. VMware Fusion and Parallels are good tools, but they are not free. The remaining options are UTM or Multipass. I chose Multipass because it has more documentation and blog posts available compared to UTM. Also, its command is very nice and simple. It would be the limitation of using distributions other than Ubuntu., but that’s not a problem for practicing kubeadm.
- Preparation
- Create a control-plane node
- launch an instance
- Check the instance’s IP address
- Open a shell on a running instance
- Set up the instance with a script
- Restart the instance and access it
- Initialize Control Plane with kubeadm
- Note a command for joining any number of worker nodes
- Set kubectl config in the cluster
- Install a Pod network add-on
- Set kubectl config in the mac
- Create a worker node
- Test
- Stop/Start and Delete
- References
Preparation
Install multipass.
brew install --cask multipass
Create a control-plane node
launch an instance
Launch instance that meets requirements in the doc.
multipass launch --name k8s-control-plane \
--cpus 2 --memory 2G --disk 5G 22.04
Check the instance’s IP address
Check and note the instance’s IP address.
multipass list | grep -e '^Name' -e k8s-control-plane
In my case, it was 192.168.64.152.
Name State IPv4 Image
k8s-control-plane Running 192.168.64.152 Ubuntu 22.04 LTS
Open a shell on a running instance
From the next step, you will execute commands on the instance, so you will need access to its shell.
multipass shell k8s-control-plane
Set up the instance with a script
Download a script from my GitHub repository to set up the instance.
wget https://raw.githubusercontent.com/yukinakanaka/kubernetes-on-apple-silicon-with-multipass/main/setup.sh
Run the script.
/bin/bash setup.sh
Restart the instance and access it
exit
multipass restart k8s-control-plane
multipass shell k8s-control-plane
Initialize Control Plane with kubeadm
Run the command below while your instance IP address you got at 1-2.
sudo kubeadm init \
--pod-network-cidr 10.244.0.0/16 \
--apiserver-advertise-address <instance_IP_address_you_got_in_1-2>
Note a command for joining any number of worker nodes
You can see kubeadm join in the log. Please take a note of it. We will use it later when we create a worker node.
In my case, the command was below.
kubeadm join 192.168.64.152:6443 --token 7qs0fh.ri0zjuys7be4hk6m \
--discovery-token-ca-cert-hash sha256:8686c5731f9410b3ea5bc7ebbf93d8cd662ea470662d782538a3921f247bfd84
Set kubectl config in the cluster
Set kubectl config.
mkdir -p $HOME/.kube
sudo cp -i /etc/kubernetes/admin.conf $HOME/.kube/config
sudo chown $(id -u):$(id -g) $HOME/.kube/config
Check if kubectl command works.
kubectl get node
example:
NAME STATUS ROLES AGE VERSION
k8s-control-plane NotReady control-plane 2m30s v1.27.2
Install a Pod network add-on
We need to install network add-on. We have many options but in this tutorial we will use a simple network add-on called flannel.
kubectl apply -f https://github.com/flannel-io/flannel/releases/latest/download/kube-flannel.yml
Check if the flannel pod is working.
kubectl get po -A | grep flannel
example:
kube-flannel kube-flannel-ds-fmhsb 1/1 Running 0 34s
Set kubectl config in the mac
Exit from the instance and move back to shell on Mac.
exit
Copy the config file to mac from the instance.
mkdir -p ~/.kube/ \
&& multipass transfer k8s-control-plane:/home/ubuntu/.kube/config ~/.kube/multipass-admin.conf
Check if kubectl command works.
kubectl get nodes --kubeconfig ~/.kube/multipass-admin.conf
example:
NAME STATUS ROLES AGE VERSION
k8s-control-plane Ready control-plane 19m v1.27.2
Create a worker node
launch a instance
multipass launch --name k8s-worker-node --cpus 2 --memory 2G --disk 5G 22.04
Open a shell on a running instance
multipass shell k8s-worker-node
Set up the instance with a script
Download a script from my GitHub repository to set up the instance.
wget https://raw.githubusercontent.com/yukinakanaka/kubernetes-on-apple-silicon-with-multipass/main/setup.sh
Run the script.
/bin/bash setup.sh
Join the node to the cluster
Run the command which you got in 1-6. Please add sudo at top.
sudo <the_command_which_you_got_in_1-6>
Check if the node joined the cluster
Exit from the instance.
exit
Check if the node joined the cluster.
kubectl get nodes --kubeconfig ~/.kube/multipass-admin.conf
example:
NAME STATUS ROLES AGE VERSION
k8s-control-plane Ready control-plane 30m v1.27.2
k8s-worker-node Ready 75s v1.27.2
Test
Run a pod.
kubectl run test-nginx --image=nginx --kubeconfig ~/.kube/multipass-admin.conf
Check if a pod is running
kubectl get po -o wide --kubeconfig ~/.kube/multipass-admin.conf
example:
NAME READY STATUS RESTARTS AGE IP NODE NOMINATED NODE READINESS GATES
test-nginx 1/1 Running 0 20s 10.244.1.2 k8s-worker-node
Stop/Start and Delete
You can stop instances easily.
multipass stop k8s-control-plane
multipass stop k8s-worker-node
Also, you can start instances easily.
multipass start k8s-control-plane
multipass start k8s-worker-node
You can delete instances by following command.
multipass delete k8s-control-plane
multipass delete k8s-worker-node
multipass purge
rm ~/.kube/multipass-admin.conf
References
That’s it. Thank you for reading my post.
