

GitOps with ArgoCD
In my previous post, I explained how to create a manifest to manage ArgoCD declaratively. However, I only saved it on my local machine. That manifest should be shared with the team. Additionally, in the GitOps approach, the shared manifest and the state of ArgoCD should be in sync. So, in this post, I will explain how to introduce GitOps for managing ArgoCD using GitHub.🐙
- Preparation
- Create a repository at GitHub
- Connect the Repository from ArgoCD
- Upload a manifest to GitHub
- Create Application of ArgoCD
- Practice GitOps!
- Wrap up
Preparation
Please prepare the followings. If you haven’t installed ArgoCD yet, please install it referring to my post.
- kubernetes
- ArgoCD
- GitHub account
Here are my versions of each tool for reference.
$ minikube profile list
|----------|-----------|---------|--------------|------|---------|---------|-------|--------|
| Profile  | VM Driver | Runtime |      IP      | Port | Version | Status  | Nodes | Active |
|----------|-----------|---------|--------------|------|---------|---------|-------|--------|
| minikube | docker    | docker  | 192.168.49.2 | 8443 | v1.26.3 | Running |     1 | *      |
|----------|-----------|---------|--------------|------|---------|---------|-------|--------|
$ argocd version --short | grep argocd-server
argocd-server: v2.7.4+a33baa3.dirty
Create a repository at GitHub
Let’s create a repository for kubernetes manifests. Please access ‘Create a new repository page’ and create a new repository. No special settings are required. Here are my settings.
- Repository name:
my-manifests - Description:
Kubernetes Manifests for GitOps with ArgoCD - Accessibility:
Public - Checked
Add a README file

Connect the Repository from ArgoCD
Next, let’s connect ArgoCD to the repository. ArgoCD offers multiple methods to access, but this time, we will use Access Token authentication with HTTPS.
Create a token of GitHub
Create a token that allow ArgoCD to access the repository. Please access ‘Settings>Developer Settings>Personal access tokens>Fine-grained tokens’ and click ‘Generate new token’.

Here are my settings.
- Token name:
Token for ArgoCD - Expiration:
30 days - Description:
This token will be used by ArgoCD - Repository access:
Only select repositories: repository=my-manifests - Permissions:
- Repository permissions:
- Commit statuses:
Read-only - Contents:
Read and write - Others:
default
- Commit statuses:
- Account permissions:
default
- Repository permissions:
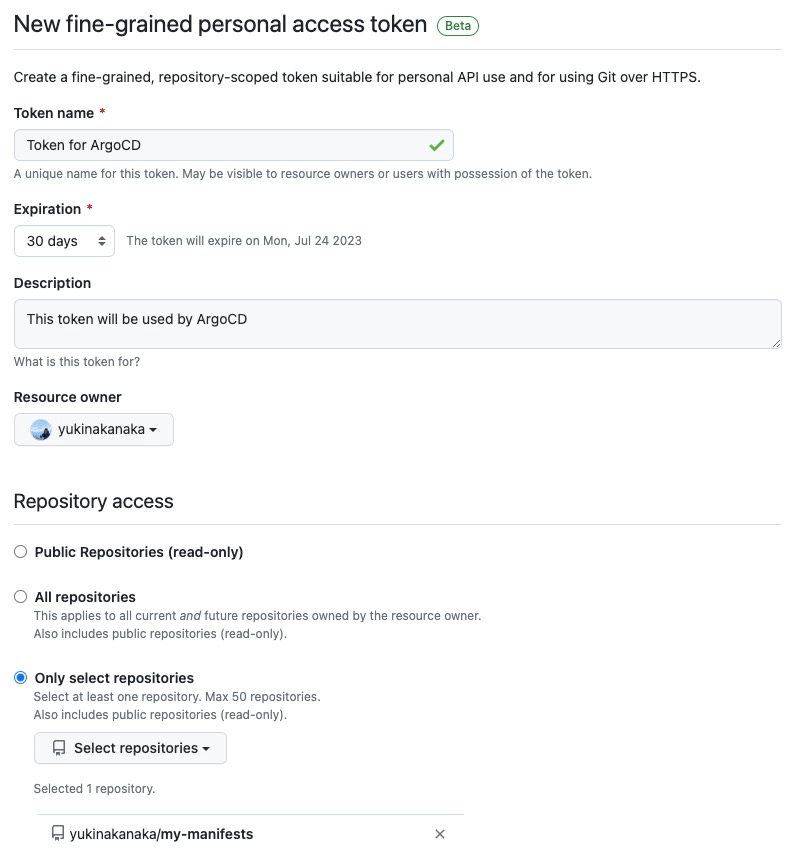

After you have finished creating a token, you can view it. Please make sure to keep a copy of that value in a secure location.

Connect the repository
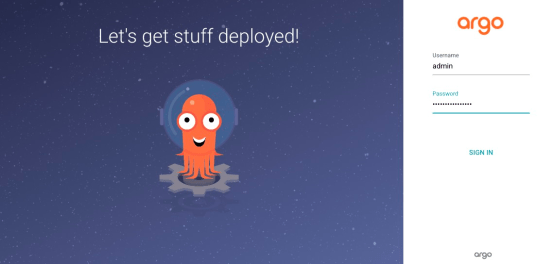
Let’s connect ArgoCD to the repository. First, please sign in your ArgoCD.
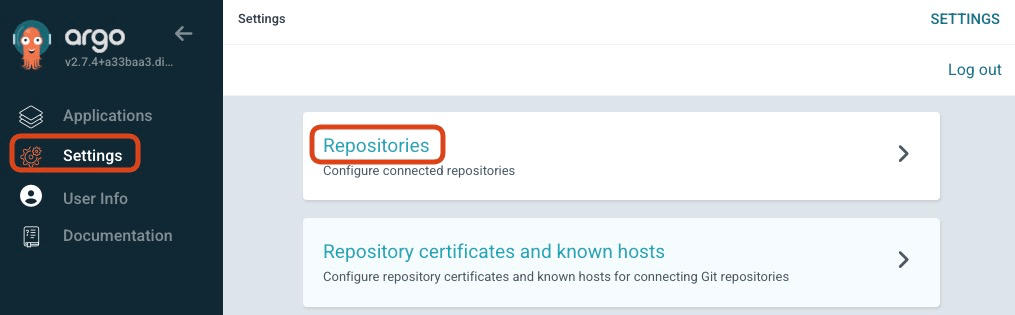
Access ‘Settings>Repositories’ and Click ‘CONNECT REPO’.

Please fill in the fields as follows.
- connection method:
VIA HTTPS - Type:
git - Project:
default - Repository: <YOUR REPOSITORY’s HTTPS URL>
- e.g.
https://github.com/yukinakanaka/my-manifests.git
- e.g.
- Username: <YOUR GITHUB USERNAME>
- Password: <THE TOKEN YOU’VE CREATED>

Click ‘CONNECT’ on the top.

Check if ‘CONNECTION STATUS‘ is Successful.

Upload a manifest to GitHub
Now, we are ready to do GitOps. Let’s upload a manifest to GitHub from your local machine.
Pull the repository
git clone <YOUR REPOSITORY URL>
Create directories for ArgoCD resources
cd <YOUR REPOSITORY NAME>
ArgoCD has multiple types of resources such as Application and Project. Let’s make one directory per type to organize many manifests. This time, I will create one directory for Application.
mkdir -p argocd-resources/applications; cd argocd-resources/applications
Commit and push Application manifest of ArgoCD
Create a Application manifest of ArgoCD in the directory. I will use the same manifest that I created in the previous post.
cat << EOF > my-argocd.yaml
apiVersion: argoproj.io/v1alpha1
kind: Application
metadata:
  name: my-argocd
spec:
  destination:
    name: ''
    namespace: argocd
    server: 'https://kubernetes.default.svc'
  source:
    path: ''
    repoURL: 'https://argoproj.github.io/argo-helm'
    targetRevision: 5.36.1
    chart: argo-cd
    helm:
      parameters:
        - name: applicationSet.livenessProbe.failureThreshold
          value: '4'
  sources: []
  project: default
EOF
Commit the file and push it to GitHub
git add my-argocd.yaml \
&& git commit -m "Add Application manifest of ArgoCD" \
&& git push
Create Application of ArgoCD
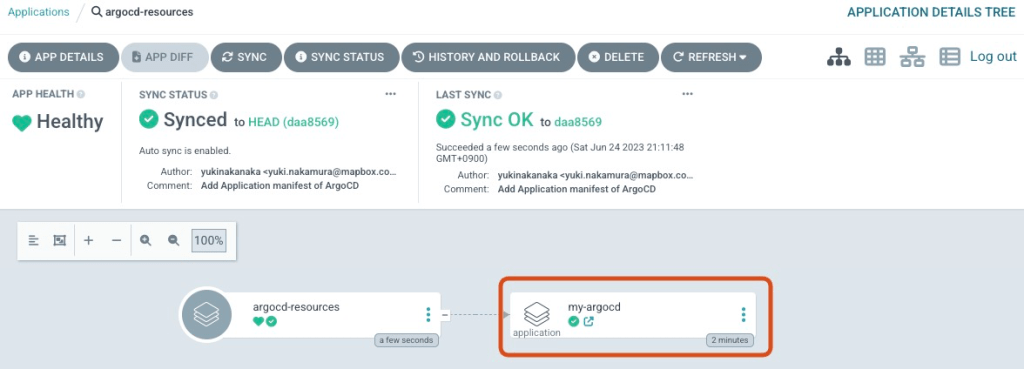
Let’s create an Application named argocd-resources that contains the Application named my-argocd. This approach is called App of Apps pattern because an Application has multiple Applications. (For now, there is only one Application, but we can add another Application in it easily.)
Create Application named argocd-resources
Click ‘NEW APP’

Fill in the form
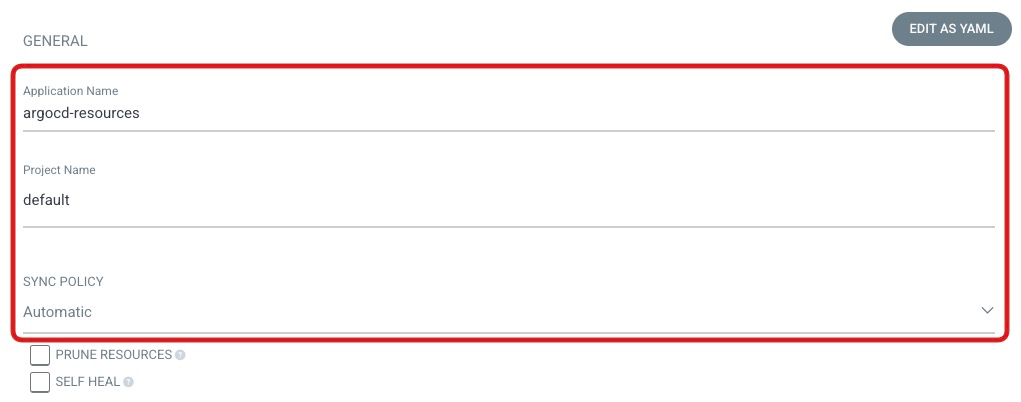
GENERAL
- Application Name:
argocd-resources - Project Name:
default - SYNC POLICY:
Automatic
SOURCE
- Repository URL: <YOUR REPOSITORY URL>
- Revision:
HEAD - Path:
argocd-resources

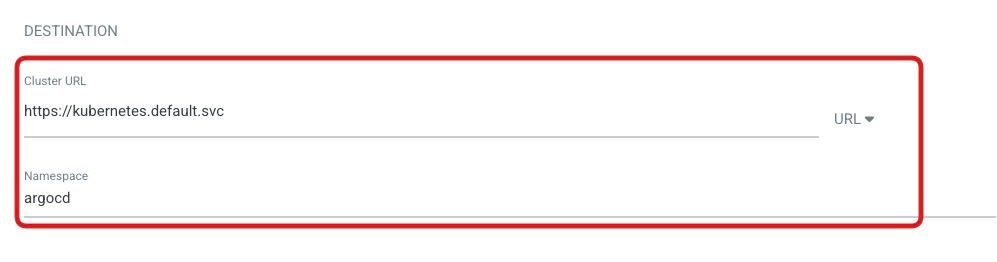
DESTINATION
- Cluster URL:
https://kubernetes.default.svc - Namespace:
argocd
DIRECTORY
- DIRECTORY RECURSE: put a check mark

Click ‘CREATE’

Please check if argocd-resources has my-argocd. It is now possible to modify my-argocd’s configuration through GitHub’s manifest!
Practice GitOps!
It’s time to practice GitOps! In this scenario, let’s change replicas of argocd-server and syncPolicy of my-argocd by updating the manifest.
Edit the manifest
Add server.replicas parameter to the manifest and set its value to 2.
cat << EOF > my-argocd.yaml
apiVersion: argoproj.io/v1alpha1
kind: Application
metadata:
  name: my-argocd
spec:
  destination:
    name: ''
    namespace: argocd
    server: 'https://kubernetes.default.svc'
  source:
    path: ''
    repoURL: 'https://argoproj.github.io/argo-helm'
    targetRevision: 5.36.1
    chart: argo-cd
    helm:
      parameters:
        - name: applicationSet.livenessProbe.failureThreshold
          value: '4'
        - name: server.replicas
          value: '2'
  sources: []
  project: default
EOF
Commit and push it
git add my-argocd.yaml \
&& git commit -m "Set server.replicas=2" \
&& git push
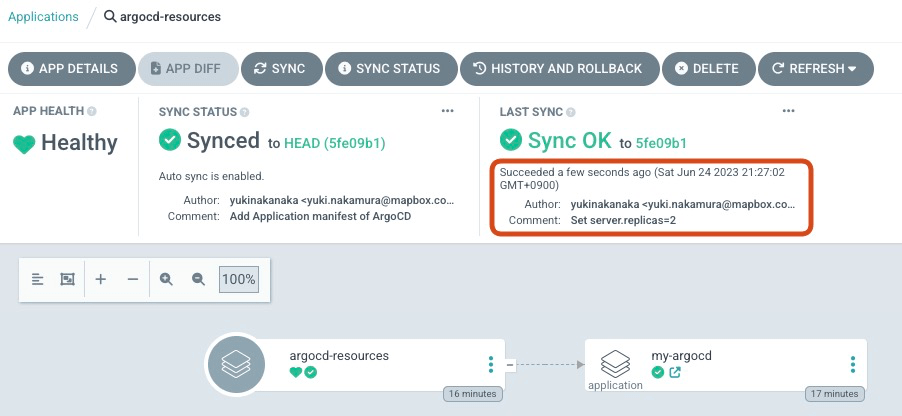
Check argocd-resources
We set argocd-resources’ SYNC POLICY as Automatic, so ArgoCD will sync the manifest and Application automatically. The automatic sync interval is 3 minutes by default. So, please wait a moment. It is OK if you can see the new Comment int the LAST SYNC !
Check my-argocd
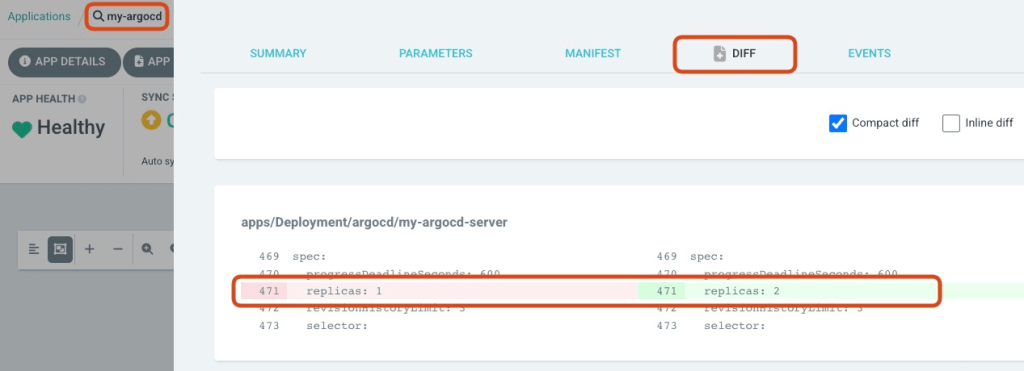
Check my-argocd’s DIFF. You can see replica is changing to 2!
Click SYNC and SYNCHRONIZE.

Set my-argocd’s SYNC POLICY as Automatic
To set SYNC POLICY as Automatic, please change the manifest like bellow. Then, commit and push it. At the same time, let’s set replicas back to 1.
cat << EOF > my-argocd.yaml
apiVersion: argoproj.io/v1alpha1
kind: Application
metadata:
  name: my-argocd
spec:
  destination:
    name: ''
    namespace: argocd
    server: 'https://kubernetes.default.svc'
  source:
    path: ''
    repoURL: 'https://argoproj.github.io/argo-helm'
    targetRevision: 5.36.1
    chart: argo-cd
    helm:
      parameters:
        - name: applicationSet.livenessProbe.failureThreshold
          value: '4'
        - name: server.replicas
          value: '1'
    syncPolicy:
      automated: {}
  sources: []
  project: default
EOF
git add my-argocd.yaml \
&& git commit -m "Set syncPolicy=automated \
&& server.replicas=1" && git push
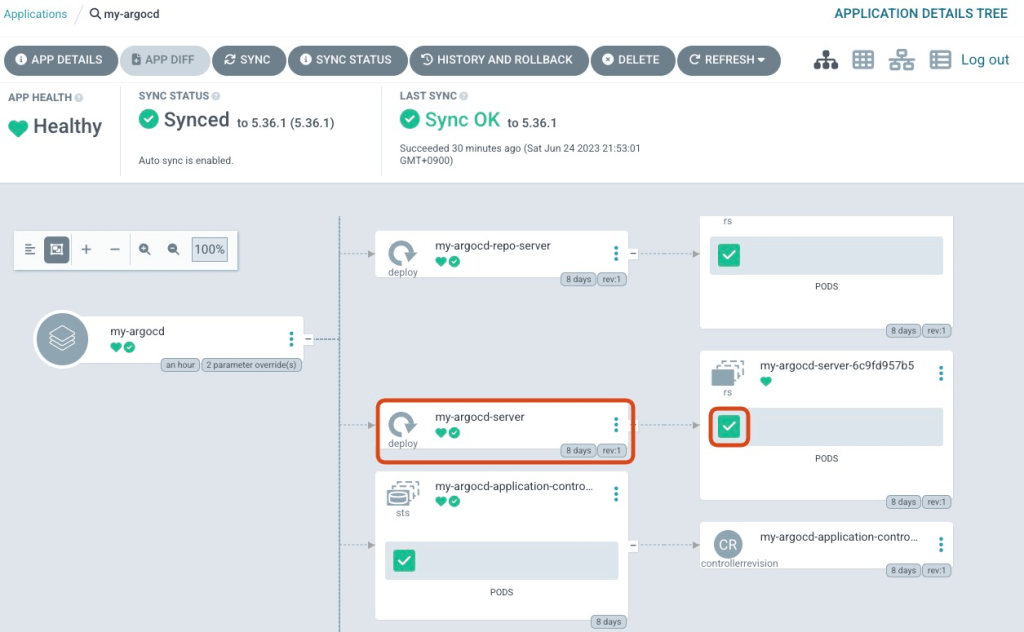
It is OK if you can confirm that number of argocd-server pod gets one !
Wrap up
I explained how to implement GitOps with ArgoCD and GitHub. Additionally, we utilized the App of Apps pattern to manage the my-argocd Application through the argocd-resources Application. Lastly, we applied a GitOps approach to modify the parameters of the Helm Chart of ArgoCD and the Sync Policy of the Application.
In a total of three articles, including this one, I have explained the somewhat niche topic of managing ArgoCD with ArgoCD. From the next article, I would like to introduce how to practice GitOps for typical applications using ArgoCD!
Thank you for reading! 🐙
